

The Bencini Koroll 24s is not only a cool, vintage 50’s 120 roll film camera but also perhaps the easiest to mod to use 35mm film.
That’s because a 35mm film canister fits snugly and as it’s film plane is flat there are no issues re focus unlike cameras like the Agfa Isoly I or Halina 6-4


What You’ll need
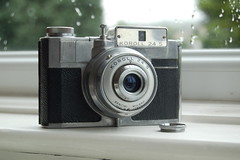 Bencini Koroll 24s
- 35mm film (200asa or less)
- 120 film spool
- electrical tape
- A changing bag (optional)
Step 1 Loading the film
The Koroll 24s has 2 natural groves on the unused 120 film side (left from rear). Gently push your 35mm cassette in so it sits with the two grooves and with the film edge heading over the film plane.
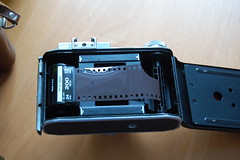
Thread your film edge through the space in the middle of a 35mm sprocket and secure. I’ve found you can do this with just a twist and winding some film round (others have used tape). Position the loaded take up spool in the exposed film socket as normal
Step 2 working out how far to wind
120 film doesn’t work with sprockets so the camera knowns how far you’ve wound on. It relies in vintage cameras on using small film windows on the back and position numbers on the roll film backing paper but 35mm film doesn’t have backing paper& isn’t marked and you’ll need to seal up those windows later. We’ll need to waste some film first time out to work out how far to wind but you shouldn’t need to worry so much next time.
Put a small sticker or other marker on the wind knob. Take a pen and mark the rear of your film. You can do this in 2 ways
- mark just before it goes onto the focus area. Gently wind the film across noting how far you wind
- Mark the film on so it is seen in the middle of left viewing window with the back closed. Wind on until seen in the middle of the right viewing window again noting how far you wind. This is more accurate but much harder to do
I find it’s somewhere about 3/4 a rotation but do check
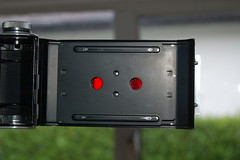
Step 3 Making the camera light tight
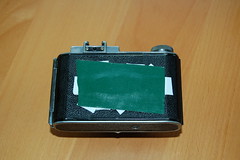
You’re almost ready to shoot but you’ll need to blank off the red viewports on the back. 120 film has a light tight paper backing with the position numbers on it, 35mm film doesn’t. You’ll need to blank off those viewing ports. Black electrical insulating tape is one option. It can be safely removed later.
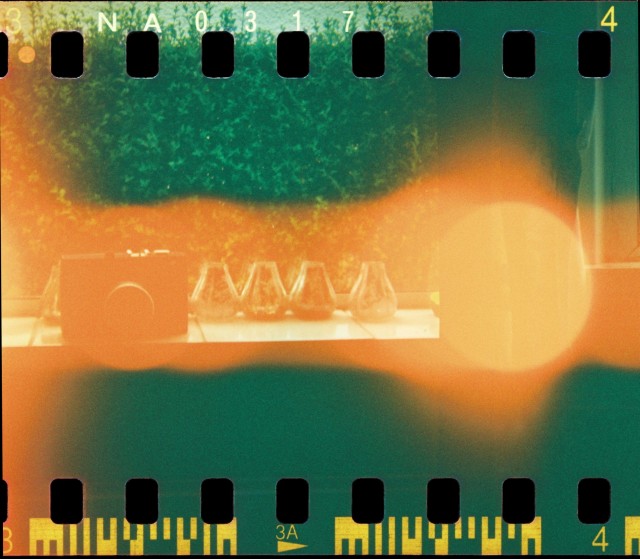
You’ll need to put it down in several layers to stop light getting through and make a tight light seal. worth making sure the rear of the camera is clean before as the tape could lift a bit in use.
Step 4 shoot
You’re now ready to go. Wind the film on using the distance you measured earlier. You’ll probably have one or 2 exposed frames needing wound in before use. As you shoot through the film be aware that unlike 35mm winders roll film cameras need less winding as they go on as for each rotation of the winder more film is pulled through as diameter of the wound side increases. I wouldn’t get too focused first time out. If you maintain a steady winding distance it just means the spacing between shots will gradually increase. If it bothers you try dropping the wind distance slightly after about 12 shots but it will be a trial and error thing
The bencini has pretty low spec. It’s 1/50 shutter and f/16 smallest aperture does make you think about using very slow film. However I got reasonable results shooting Agfaphoto vista plus 200 in a partially cloudy day with it at f/16 and certainly I think it can get away with 100asa 120 roll film quite well so I’d start out by shooting 100 or 200asa film. It is a trial and error thing
Eventually the winding will stop
Step 5 Unloading the film
This will potentially be the trickiest part. There is no way of rewinding your film so you’ll need to open up the camera in complete darkness. You may have access to a darkroom or more likely a film changing bag (you can by on ebay for a few quid) but panic not if you don’t. You can try doing in a dark room with curtains drawn and lots of coats, duvets etc in layers over the camera and try and keep it as light tight as possible but if that worries you as said a changing bag is pretty cheap.
Try to avoid touching the film (hard when you can’t see it). Unhook the 35mm film cannister and the spool with the expired film and rewind back into the cannister.
Step 6 Process & Scan
You should now have your film back in a cannister and ready to process.
If you self process everything should be straight forward although you’ll need a mask capable of showing sprockets. Lab processing itself isn’t the issue, the scanning is. Check to see if your lab does sprockets (odds on no if it’s a supermarket type minlab). If they don’t you’ll either need to find a lab who does (I use Fuji Carlisle – these nice folk can do C41 or Xpro with sprockets) or ask them to process and do the scanning yourself.
Learn from the results and go again !
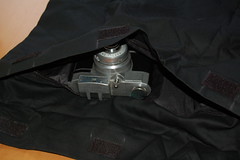
I just got one of these cameras off Etsy. Can’t wait to try this with my expired 35mm Kodak Ektachrome 😀
OMG, great info about lightleaks!!! thanks so much!!!!!!!!!!!!!!!
I admire the enthusiasm and work put into this project, but I can’t help wondering if it’s all a bit of a lost cause as you can get 24 exposures in a similar rectangular format from normal 120 film in this camera anyway! (sorry to be a wet blanket!) J
Not being a wet blanket John but it is more the challenge and the fun of getting sprockets.
From budget point of view it is also cheaper. Cheapest 120 rolls I can think of cost about £4/roll. I can buy 4 rolls of AVP200 35mm at Poundland for that and I can get ‘enough processed at any mini lab even cheap supermarket ones for £2-3 a roll. Okay so I lose the sprockets but many more pro labs will do sprocket scanned 35mm for the same price as 120 processing
I thought modding a medium format like this was the only way of getting sprocket hole exposure. The complications of frame counting and rewind had put me off. I recent discovered a dirt cheap compact that can be modded really easily too, bonus quite good image quality one too!!. I had never heard of this before, I was wondering if anyone else had or would be interested in doing so? Sorry if this isn’t quite the right place to ask but it’s vaguely on a theme.